How to build your own drone? And should you build your own drone? These questions come up quite often in the forums related to drone...

These questions come up quite often in the forums related to drones and remote control hobbies in general. You have seen one either live or on TV somewhere and you think it is cool to fly your own quadcopter so after a bit of google search you see several options, either readymade drones or drone kits made to help you build your own drone.
So the important question is should you build your own drone?
And if yes how do you go on building a quadcopter in the first place? All of these questions and a lot more will be answered below, so read on! To make things easier for you, the first question to answer is should you build your own quadcopter or not? If you have decided that the answer is yes, then I suggest you skip the first part of this article and get ahead to
How to build your own drone?
Contents
- 1 How to build your own drone? And should you build your own drone?
- 2 Should I Build My Own Drone?
- 3 HOW TO BUILD YOUR OWN DRONE – Part 1:UNDERSTANDING BASIC DRONE TERMINOLOGY
- 4 HOW TO BUILD YOUR OWN DRONE – Part 2:
- CHOOSING A FRAME FOR YOUR DRONE
- 4.1 WHAT ARE THE FRAME CONFIGURATIONS USED FOR DRONES?
- 4.1.1 Drone frame type #1 BiCopter – 2 Motors Multicopter
- 4.1.2 Drone frame type #2 TriCopter – 3 Motors Multicopter
- 4.1.3 Drone frame type #3 QuadCopter – 4 Motors Multicopter
- 4.1.4 Drone frame type #4 HexaCopter – 6 Motors Multicopter
- 4.1.5 Drone frame type #5 Y6 Copter – 6 Motors Multicopter
- 4.1.6 Drone frame type #6 OctoCopter – 8 Motors Multicopter
- 4.1.7 Drone frame type #7 X8– 8 Motors Multicopter
- 4.2 WHAT ARE THE DIFFERENT SIZES OF DRONES?
- 4.3 WHAT MATERIALS ARE DRONES BODIES MADE OF?
- 4.4 WHICH FRAME TO USE FOR A DRONE?
- 4.5 OTHER CONSIDERATIONS WHEN CHOOSING A FRAME
- 4.6 Gimbal
- 4.1 WHAT ARE THE FRAME CONFIGURATIONS USED FOR DRONES?
- 5 HOW TO BUILD YOUR OWN DRONE – PART 3: MOTORS, PROPELLERS, AND PROPULSION
- 6 HOW TO BUILD YOUR OWN DRONE – PART 4: THE FLIGHT CONTROLLER
If you are unsure if you really should or should not build your own quadcopter then stick with me, but before even attempting to build your own quadcopter you REALLY need to learn how to fly and control a quadcopter. Controlling a remote drone is not that hard but it needs some training because drones can get pricey and crashing a $1000 quad is no fun. So if you still haven’t bought your first drone then I highly recommend that you read our best cheap drones roundup. Another thing worth noting is whether or not you will need to register your drone (either ready made one or DIY) with the FAA, to found out more read our FAA Part 107 guide.
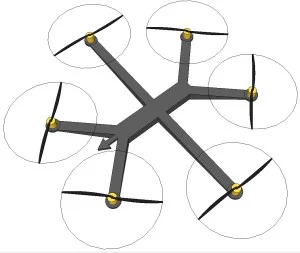
With all this taken care of, now let’s dive in, Should you build your own drone? And if yes then how to build your own quadcopter? If you find the second picture intimidating then you need to buy one. If you find it cool, then go ahead and build your own drone, simple right? Now on a more serious note, to give you a proper answer you need to ask yourself some basic questions;
Building your own drone gives you the flexibility to choose the cheapest parts you need for your build to help you control costs and cut down on your budget. This can be a reasonable option if your budget is limited because you can build an extremely high-end drone for a fraction of what a pro drone will cost from the likes of DJI or Yuneec.
One thing though can upset this equation…if you get addicted, can building a drone can get really addictive to geeks like us J costs can easily build up. Getting that cooler goggle or that better controller might not cost much more on its own but in the long run things do add up. Also frustrations like wrong orders or incompatible parts or delayed shipments can also add to the cost of things.
 So if you decide on building your own drone then you will need to have some safety margin in your bank account to account for the unexpected stuff. On the other hand with a RTF drone budget can be controlled easily, you can very easily pick the drone that most suites your budget but don’t forget that you will need some spares and extras to go with it, but that’s easily calculated.
With all that said and done it is really up to you to decide what suits you best, to build your own drone or buy a ready to fly one. If you decided to buy a drone then go ahead and read our drone-buying guide, otherwise if you want build your own then please scroll down and get your notebook ready to take notes because this is going to be a long ride.
 With the following article I will try to guide you through every you need to get you airborne. Be warned this is a very long article with lots of links and videos. We will take things slowly at first by discussing the basic terms used in the quadcopter world and we’ll tell you how to choose the basic parts of the copter as well as the parts which make it fly and how to control it once it is in the air. Finally I will suggest for you a parts list to build your very own drone along with a video from our friends at Flight Club that tells you exactly how to assemble the parts and get flying. So let’s get started.
PART 1:UNDERSTANDING BASIC DRONE TERMINOLOGY
Before you can learn how to fly you need to learn how to speak drone, apparently. In the drone world, there lots of acronyms and terminologies used to describe parts and methods related to drones and you need to learn these so you can understand what all the articles and forum posts are talking about when discussing drones and how to build them. Following you will find a short list of the acronyms used in relation to drones and quadcopters in general, for a more complete list please checkout out our drones’ acronyms post.
BASIC ACRONYMS
Drone Synonymous with the term “quadcopter” or “UAV” or “UAS”. The term “drone” is usually related to military use of unmanned aerial vehicles. DIY Stands for “Do-It-Yourself”, which in this case, means building a custom quadcopter by using different parts that may or may not have been originally designed for one another. DFY Done For You, another term meaning that you are getting a complete solution. UAV Stands for “unmanned aerial vehicle” (of any kind). UAS is the FAA’s term for drones which is short for Unmanned Aircraft System.
MECHANICS
Size:
With all this taken care of, now let’s dive in, Should you build your own drone? And if yes then how to build your own quadcopter? If you find the second picture intimidating then you need to buy one. If you find it cool, then go ahead and build your own drone, simple right? Now on a more serious note, to give you a proper answer you need to ask yourself some basic questions;
- Do you have a long-term plan or goal?
- What is your long-term plan?
- Do you like tinkering with solder irons and screws?
- How deep is your wallet?
Building your own drone gives you the flexibility to choose the cheapest parts you need for your build to help you control costs and cut down on your budget. This can be a reasonable option if your budget is limited because you can build an extremely high-end drone for a fraction of what a pro drone will cost from the likes of DJI or Yuneec.
Building your own drone gives you the flexibility to choose the cheapest parts you need for your build to help you control costs and cut down on your budget.
One thing though can upset this equation…if you get addicted, can building a drone can get really addictive to geeks like us J costs can easily build up. Getting that cooler goggle or that better controller might not cost much more on its own but in the long run things do add up. Also frustrations like wrong orders or incompatible parts or delayed shipments can also add to the cost of things.

With all that said and done it is really up to you to decide what suits you best, to build your own drone or buy a ready to fly one. If you decided to buy a drone then go ahead and read our drone-buying guide, otherwise if you want build your own then please scroll down and get your notebook ready to take notes because this is going to be a long ride.

PART 1:UNDERSTANDING BASIC DRONE TERMINOLOGY
Before you can learn how to fly you need to learn how to speak drone, apparently. In the drone world, there lots of acronyms and terminologies used to describe parts and methods related to drones and you need to learn these so you can understand what all the articles and forum posts are talking about when discussing drones and how to build them. Following you will find a short list of the acronyms used in relation to drones and quadcopters in general, for a more complete list please checkout out our drones’ acronyms post.
BASIC ACRONYMS
Drone Synonymous with the term “quadcopter” or “UAV” or “UAS”. The term “drone” is usually related to military use of unmanned aerial vehicles. DIY Stands for “Do-It-Yourself”, which in this case, means building a custom quadcopter by using different parts that may or may not have been originally designed for one another. DFY Done For You, another term meaning that you are getting a complete solution. UAV Stands for “unmanned aerial vehicle” (of any kind). UAS is the FAA’s term for drones which is short for Unmanned Aircraft System.
MECHANICS
Size:
- This determines the drone’s class (mini, micro, etc.) and is given in millimeters. This is measured by the greatest distance between the two motors on the quadcopter.
- Is short for “Center of Gravity”, which is the point on the drone where weight is equally distributed on all. You need to know this to be able to properly balance your build.
- These are usually small parts made of rubber or similar materials, to absorb vibration from motors or to cushion hits the drone might receive.
- This is the main chassis of the drone, upon which all other parts are installed and mounted.
- These are the legs on which the drone stands and are used to allow the drone to land on hard surfaces safely. They are usually made out of plastic but rubber is also common.
- Is short for Light Emitting Diodes are used for many things, most important of which is to give you an idea of which way is forward on a drone especially at night. They also add to the coolness factor.
- Being hit by a fast moving part is not good obviously. These guards protect both the drone’s propellers from being damaged when crashing as well as to protect others incase they get hit by a drone.
- This is the outer body of a drone, which serves to help protect the inner parts of the copter from damage as well to make the drone look appealing. Manufacturers also use the shell for styling and aerodynamics but for most DIY builds no shell is used to cut down on weight.
SENSORS
Accelerometer:
- This is used to measure liner acceleration.
- A sensor used to measure air pressure. This tells the drone how high above sea level it is to determine its own altitude.
- Like the accelerometer but this is used to measure angular acceleration enabling the drone to balance itself midair.
- Is short for Global Positioning System receiver this receives signal from global GPS satellites to tell the drone where exactly it is located. This gives the pilot the ability to do all kinds of cool stuff like plotting a path for the drone to follow and to make the drone return home to where it flew off.
TYPES
- RTF: Is short for “Ready-to-Fly”. This is a completely assembled and ready drone that you only take out charge the battery and you are good to fly! Nothing more required.
- BNF: Is short for “Bind-and-Fly”. As above but this comes missing one important part, the transmitter. So you will need to get a compatible transmitter and bind it with the drone in able to make it fly.
- ATF: Is short for “Almost-Ready-to-Fly”. Now things get a bit messier, this comes usually as a kit of several parts which need to be assembled first. Also some part will not be included and you will need to get them separately. Might be a good start point for a DIY drone build.
- Multirotor: This term can be used to describe any aircraft that has multiple rotors.
- Tricopter: A UAV that has three motors/propellers.
- Quadcopter: A UAV that has four motors/propellers.
- Hexacoter: A drone which has six motors/propellers.
- Octocopter: A UAV that has eight motors/propellers.
PROPULSION
ESC
- Is short for “Electronic Speed Controller”, an electronic part that controls how much power the motor receives in order for the drone to do its thing.
- Is short for “Lithium Polymer”, This is the technology used in the battery for your drone. This is the standard now for making drone batteries because they store lots of power compared to their size and weight. However they can be a fire hazard so you need to handle the batteries with care.
- This one should be clear enough J This is what makes your drone move or hover by rotating the propellers. There are two types of motors used in quadcopters, either brushed or brushless. We will discuss what this means and which is better later on in the article.
- Is short for “Printed Circuit Board”. This is an electronic component that has all kinds of circuits, and controllers installed or “printed” on it. These connect all your electronic parts together.
- The small part connecting the props of the quadcopter to the motor to allow the props to spin.
VIDEO
FPV
- Is short for “First Person View”. One of the coolest reasons for flying a drone! This is when you can view the live video received from the drone on your controller or better yet you goggles making you feel the speed of the drone.
- Is short for “Liquid Crystal Display”. This refers to the technology used in the monitor used to view the video photage from the drone’s camera.
- The arm that connects the camera with the body of your drone to stabilize the camera and make sure it stays level in relation to the ground even if the drone tilts and to reduce the shaking resulting for the movement of the drone.
- This is a brand name for an action cameras company, which makes small cameras that can be installed on a quadcopter because of their small size and weight. People now use this term to refer to any sports cam even though there are many other manufacturers.
CHOOSING A FRAME FOR YOUR DRONE
Now that you know what’s what about the drone terms, let’s get started with our actually building your own drone. The first and most important step in building your own quadcopter is to choose the frame for your drone. Why is this important? Simply because this will determine what you can do with your drone and depends on why you want to build your own quadcopter in the first place. Referencing back to our introduction, drones can be used for many reasons.

Things like taking aerial photography or racing or simply plain old toying around can all be achieved by a drone. However not all of these functions are suited for all types of drones. For example if you want your drone to take photos and videos with a professional camera you will want to build a big drone with a high carrying capacity. On the other hand, if you just want to race indoor then a smaller lightweight drone will serve you better.
So continue with your notes and read on. But always keep in mind why you want to use your drone for…So let’s talk about all the different classes and types of drones that can be built today. UAVs can be classified based on many factors, most important of them is the configuration, size, construction material.
WHAT ARE THE FRAME CONFIGURATIONS USED FOR DRONES?
A very simple arrangement of two arms with two motors connected on either side of an axis. Usually the forward direction points perpendicular to the arms axis to make stabilizing that bit easier.
In theory, this is the least expensive configuration to build because you simply have to get less of everything, less motors, less servos, less propellers and even a smaller chassis.
1 BiCopter

However this configuration can get quite challenging to balance during flight and is not very popular among multirotor builders and there isn’t a lot of information about it online. So if this is your first build I highly suggest you skip this design. However if you have built a few drones before this might be a good challenge to get into, and if you do please show me the images of the build!
Pros: Relatively cheap to build and can make for a cool build. Cons: Can be extremely hard to build a working bicopter and fly stably.
2 TriCopter
 A drone with three arms typically arranged with 120 degrees between each arm with the forward direction between two of those resulting in what’s called a Y3 arrangement. The rear motor normally rotates to in order to counteract the gyroscopic effect of the odd number of rotors, also to control the yaw angle. Sometimes two motors are mounted on the rear to achieve the same effect. Things do tend to get a big complicated with this configuration making it not so much of a beginner friendly design.
Pros: A more unique configuration to choose when building a drone because it operates similar to a plane more than it does as a copter. This will cost a bit more than a BiCopter but less than other configurations. Cons: As mentioned above the rear of the copter needs to either have a servo or two motors making designing and building this configuration more complicated.
3 QuadCopter
This type of quadcopter design is eadily the most common among builders. As its name suggests it has four motors attached to four arms in a symmetrical configuration however the forward direction varies, the most typical direction put it between two arms resulting in what’s called an X configuration. Another option is to have the forward direction along on of the axises making it a + configuration. For a beginner this is the configuration to choose.
 It is easy to control and very stable mid flight and almost all controllers are built with this configuration in mind because of its versatility and ability to adapt to any drones usage you might think of as demonstrated by all the popular designs from the likes of DJI and Parrot.
Pros: Simple and easy to start with, balanced configuration and has lots of compatible parts. This is the configuration to start with. Cons: No configuration is without its faluts. Because of its basic shape and design there is no backup incase anything fails. So if a motor fails or a rotor breaks the drone will go down because opther parts cannot compensate for the loss resulting ina crash. So you need to make sure to test proerply and get some quality parts to start with.
4 HexaCopter
Things are getting more interesting now, this one has 6 arms with six motors attached to them. The added motors provide more lift, i.e. They allow the UAV to carry more payload and fly more stably. This helps a lot when building a drone for aerial photography as you can use a more professional and hence heavier equipment to get that perfect shot. The forward direction of this UAV can be either between tow arms or along one of the arms.
 Pros: As mentioned above, this is a simple step up from a quadcopter but with the added redundancy and stability, meaning if one motor fails the drone can still land itself without crashing hard. And the more important reason to build such a drone is for the extra payload it is able to carry making this our second recommended configuration to build. Cons: The added power and redundancy do have a disadvantage in terms of battery needed. To be able to operate the extra motors a bigger and more expensive battery is needed, and of course the added parts all add up making this a more expensive alternative to a quadcopter.
5 Y6 Copter
Another UAV configuration with six motors but this time it only has three arms to connect all the motors. This types looks quite similar to a TriCopter but with the added motor on each arm. Note that all the motors, even those facing downwards, push air downward to counteract gravity. This gives redundancy, so in case a motor failure this drone can land itself without crashing.

Pros: This is kind of a hybrid design, it only has three arms instead of four or six meaning less weight and in general has less components than a HexaCopter making it cheaper. And because of the double motors on each arm the gyro effect is eliminated meaning no need for a servo.
Cons: While this has less components than a HexaCopter it has more total components than a quadcopter meaning it weighs more and as such will need a bigger battery to achieve the same flight time. Also when compared to a similar spec HexaCopter this configuration has less payload because the upper motor is affected by the lower motor reducing efficiency. Also not all flight controllers support this configuration.
6 OctoCopter
Moving into the big leagues, this configuration has eight motors connected to eight arms, this makes for a very powerful drone capable of lifting quite a big payload. But as you would imagine this all means more parts, more weight, more batteries and more costs. As a first time build this is not a configuration I would recommend, but if you have the parts from previous failed attempts, then why not, right?
 Pros: All those extra motors will left a huge payload other drones are capable of making this perfect for more demanding tasks, think of an Amazon delivery drone. Also all those motors can compensate for a failed motor meaning a safe return to ground rather than a huge crash.
Cons: As discussed earlier, this configuration means more. More of everything. You will need to get extra motors, ESCs, arms, batteries and everything else to support such a monster drone making this quite expensive feat to tackle, and making this more complicated than building a quadcopter.
7 X8
 Another hybrid design, based on the typical quadcopter but with eight motors mounted on 4 arms. This is similar to concept to the Y6 configuration discussed above but with the added arm and motors. Pros: compared to a typical quadcopter this carries more payload and has built-in redundancy to compensate for failures. Cons: similar to an OctoCopter this has more parts to handle and get in the air making it more expensive option to build.
WHAT ARE THE DIFFERENT SIZES OF DRONES?
Another important factor to consider is how big a drone you want to build. Drone sizes vary a lot, there are those Nano drones, which are smaller than your palm, and there are drones made to fit inside your pocket, all the way up to military sized drones, which need vehicles to transport them.
For a new builder getting a medium or small sized frame is ideal, you will have decent space to work and yet it is small enough to be manageable and not requiring lots of power to fly, so what you are looking for is a frame size between 350 and 600mm. These numbers represent the greatest distance between the mounting points for the motors measures in millimeters.
ARE SMALLER DRONES LESS EXPENSIVE TO BUILD THAN LARGE ONES?
In theory, yes. Smaller drone means smaller and less powerful batteries and motors needed to fly a quadcopter, but in reality, the choice of equipment determines the final cost. Choosing high quality brushless motor well cost more than a brushed one, regardless of size. The same applies to batteries as well. Therefore, while the frame well definitely cost less if it is smaller the total price for a drone does not necessarily reflect its size.
WHAT MATERIALS ARE DRONES BODIES MADE OF?
When building your own drone you can choose to build it using any solid material you can think of as long as it is strong enough, in theory at least. But to create an efficient drone you need to consider several factors when choosing what materials to use. For example, the drone body needs to be as light weight as possible, strong enough to handle crashes, does not transmit vibrations and cheap enough to obtain and fix. So let’s consider some materials which have been used for building drones.
PLASTIC

The most commonly used material for building “small toys” is plastic. And drones are no different. Most of the commercial drones are built using plastic. If you want to build your own frame however you need plastic sheets which are rigid and don’t flex easily so your UAV can balance itself and fly properly. Recently 3D printing the frame of a drone has been booming, this might be a good option for a small drone but maybe not so much for bigger ones.
WOOD
Wood is not a material I would recommend for a drone build, but it has been used before and if you are good with a saw and know, your way around woodworking then this can be an effective DIY material to start with. Just make sure you choose a strong and rigid wood type. You also need to make sure that your design is modular so in case of a crash you will only need to replace the broken part and not start a new frame.
ALUMINUM

Another common and easily accessible material is aluminum. This is strong enough to sustain a few crashes without damage. Indeed there are stronger materials and there are cheaper materials, but aluminum sets itself apart by being a middle ground among all of those. Also the fact that you can find readily available sections of aluminum of all shapes and sizes helps a lot.
CARBON FIBER
A much more fancier option is using carbon fiber to build your drone. Due to its high strength and light weight you can build amazing drones capable of high payloads and high speeds using carbon fiber. But all of this is not cheap of course. Also take note that carbon fiber interferes with radio signals so your antenna range can be affected if mounted incorrectly.
WHICH FRAME TO USE FOR A DRONE?
If you are starting out then building your own frame for a drone is not something I recommend an you are better off buying a ready made frame that will fit all the equipment you need. With all that said and done the most important factor in deciding which frame to get for your drone build is what do you intend to use the drone for. So here are my recommendations for frames based on the expected use…
OTHER CONSIDERATIONS WHEN CHOOSING A FRAME
Gimbal
 As explained earlier, a gimbal is the part that connects the camera with the body of the drone to stabilize the images and reduce vibration. You need to consider whether you need a gimbal in the first place or not and if yes then make sure that the chosen frame can mount the gimabal of your choice in a position that allows you to balance the build with other componenets like the battery for example.
Payload
Another interesting use of used is to delivery items, or even release and drop items. If this is something you think you want to play with then you need to account for the size of objects and their relation to the center of gravity of the drone to keep it balanced.
Landing gear
 Depending on your usage and if you want a gimbal or not for example you might need a frame with long landing gear that protects your accessories from touching the ground when landed.
PART 3: MOTORS, PROPELLERS, AND PROPULSION
Now that you have decided what your end goal would be in regards to the drone you are building and have chosen a frame accordingly, the next step in building your own drone is to think about how we will get it to fly! This part is called the propulsion system, and is composed of motors, propellers, ESCs, and battery.
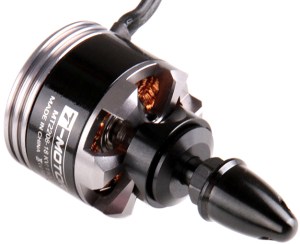
THE MOTOR
 This is the part that moves the propellers to generate thrust and lifting power to get the drone airborne and control its altitude and direction. First thing to consider is that you need identical motors to be mounted on your drone for stability. But despite this even identical motors’ speed might vary a bit, this is where the flight controller comes in to balance stuff. We are not going to get into the details of electrical motors and engineering because we don’t need to build a motor, only know how to choose the right one. And in this regard there are two options to choose from, either a brushed motor or a brushless motor.
Which is better for a drone, a brushed motor or a brushless motor?
Generally speaking brushless motors are better because they produce more thrust but are more expensive than brushed motors. This is why cheaper drones like the Syma X5 series uses brushed motors, while the DJI uses brushless ones. Other downsides of brushed motors is that they can wear out faster than brushless ones meaning they are more likely to fail and need replacing.
On the good side, brushed motors are easier to connect and wire up because they only have 2 wires instead of 3 for the brushless motors. Also when choosing a motor please note that mounting holes needed as well as the propellers mounting is compatible with the props you have chosen.
Thrust
Another important factor you need to consider when choosing a motor for your drone build is thrust. This is usually supplied by the manufacturers in a table indicating the amount of thrust (indicated in Kg, Lbs., or N) per propeller size. How can you use this data? Let’s say a motor spec is 0.5KG with a 10” propeller.
This means if you are building a quadcopter with 4 of this motor and using 10” props on it then the total weight of the must not exceed 2 KGs ( 4 x 0.5 Kg = 2.0 Kgs ). In this case, if your drone weighs exactly 2 Kgs then it might not even take off, so you will either need to lower its weight or get stronger motors. Always have more lifting power than the total weight of your drone.
PROPELLERS
 The propellers or props as they are often called is what actually moves the air to lift the drone and generate thrust. Props design and calculation is something extremely long and complicated and is far beyond the scope of this article. But as always if you want to read up more on this subject please check here.
Now what concerns us with this topics how to choose a prop. For new builders I suggest not to reinvent the wheel, check out what is the recommended props to be used with the motor you have chosen and read op online and see what others are doing, makes things much simpler. However there are a couple of points you need to keep in mind, first the size of the props and the rotation of the props.
PROPELLERS’ SIZE
The size of the props is indicated in either cm or inches and is measured from the furthest two points of the blades. What you need to know about this is that in general smaller blades are best for racing drones where fast reactions and required and larger blades are best suited for more stable flights like aerial photography.
PROPELLER ROTATION
 Blades rotate either CW “Clock Wise” or CCW “Counter Click Wise”. You need to know which side of the propeller is meant to face upwards (the top surface is curved outward) and which is meant to face downwards. If you have chosen a configuration where there are two motors on each arm, this means that you will need to have a rotor that is on the bottom of your drone.
You need to pay special attention to the way it mounts because the way that is supposed to face upward still needs to face upwards, even if it is mounted below. The documentation that came with the flight controller should show you which way each propeller is intended to turn for each multi-rotor it supports
MATERIALS USED TO MAKE PROPELLERS
Just like the frame, the propellers can be made from various materials, each with its own pros and cons.
PLASTIC
Because of its low cost and respectable durability, plastic is by far the most popular choice for propellers in the multi-rotor industry but plastic propellers do have their downsides, they are not very reliable. Incase you crash, especially if you do not have prop guards on, you are very likely to break the plastic propellers. Even with the guards on a serious crash can still break your props. They shouldn’t be a huge problem because of their low price you can easily replace them. Most commercial quads even come with several spare propellers included.
WOOD
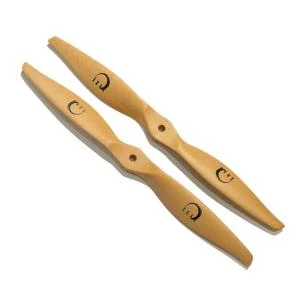 While not very common, wood is still used as a propeller in some situations because it is more sturdy than plastic but because of the way it is manufactured wood is not very common.
CARBON FIBER

And finally the top of the line material to choose from propellers is carbon fiber. Carbon fiber is much stronger and more stiffer than plastic meaning it is less likely to break during a crash but it is much more expensive than plastic. If you ask me, the cost, benefit ratio favors plastic. So unless you are building a top of the line drone and you are already good at flying I would stick with plastic propellers.
PROPELLERS GUARDS
 The “prop guard” is is exactly what its name suggests…a protection for your props. This will help you a lot when you crash the drone because the gaurds will prevent the fast rotating propellers from coming in contact with any hard surface preventing them from braking.
At least that’s the theory, but of course in the real world if you crash hard you are still likely to break the props, which is why I recommended cheap spare props to be always available. Note though that having prop gaurds does add weight to your drone making your flight time that much shorter but they are important to have until you really know how to fly.
THE ELECTRONIC SPEED CONTROLLER (ESC)

This electronic component links the flight controller with the motor. What it does is control the voltage and power that the motor receives and thus setting the speed that the motor spins and how much lift is generated. This is essential to be controlled for each of the drones motors which is why you will need an ESC for each motor you have on the drone. Things to note when choosing an ESC is that it is able to handle more than the maximum current that the motor needs so that it does not burn out, also that is has the right voltage.
CONNECTORS
Connecting the Electronic Speed Controller can seem confusion at first because of all the wires it has on both sides, and they are; On the input side you will have two wires for the power, usually thicker than the others, and you will have 3 wires for the input signal usually bullet connectors. And on the output side you will have another 3 wires that you need to connect to your motor.
FIRMWARE
Since the ESC’s job is to translate the flight controllers commands into voltage signals to control the motor, the ESC needs to be able to give out commands quickly. The problem with this is that drones in general are new in comparison to other remote control toys, which also use ESCs. As such, the ESCs were originally designed for RC cars; these do not require the fast output needed by a drone to be able to stabilize itself midair. Therefore, you will need to choose an ESC with a firmware that is built for drones, the most popular of which use SimonK or bheli firmware.
POWER DISTRIBUTION BOARD
 Each drone has only a single battery and several motors, so the power coming from the battery needs to be split into several parts to power each ESC, this is done through the Power Distribution Board. The thing to note here is the type of connector used by the PDB and the ESC, most manufacturers use a standard connector but cheap boards don’t use connectors at all and just assume that you will solder the wires. In such case be prepared for some soldering fun.
BATTERY
 The most commonly used battery technology for drones these days is Lithium Polymer (LiPo for short). Other technologies based on Lithium combinations do exist but are not very common. NiMh and NiCd are not very suitable for drones because in comparison to their capacity and discharge rate they are too heavy.
As everything in life, LiPos are not perfect, they have two problems, first their cost is higher and if not handled properly they can be a fire risk. Things to look for when choosing a battery pack are the Voltage, Discharge rate and capacity.
Voltage
First check the voltage of the motors you have chosen, the voltage on the battery pack and the motors need to match. LiPo batteries are mostly made of 3.7V cells. On the battery spec you will find marking like 4S, a 1S equals 3.7V so 4S is 14.8V.
Capacity
This is measured in Ampere Hour Ah and can range from 0.1 Ah (100mAh) to much more than that. Typical drone batteries are 2 to 3 Ah. Choosing which capacity seems obvious, the bigger means more flight time, but you need to consider that bigger means heavier as well. You can expect about 10 to 20 minutes of flight time from a typical drone which is not much so you should get extra batteries.
DISCHARGE RATE
This measures how fast the battery capacity can be fully used or discharged. It is measured in C where C is the battery capacity. What you need to look for in a battery is at least 5C meaning is can fully discharge itself in 1/5 of an hour.
Other things to consider
As we already mentioned in the introduction, LiPo batteries need to be handled properly to prevent fire or explosion risk so if you have your doubts about the battery or the charger it is better to be safe than sorry and you should simply replace the suspect part. Particularly if you notice that the battery pack has become bigger this indicates that it is leaking and must be disposed of properly.
When storing or charging the battery you should put it inside a LiPo safe bag to prevent fires and you should not leave it charging overnight. Most LiPo batteries have two connectors, one is used to connect the ESC and the other is used for charging, the manual should tell you which is which, but usually the smaller wires are used for charging. You need to choose a charger that can charge several batteries at once and is balanced to prevent any damage to the batteries.
PART 4: THE FLIGHT CONTROLLER
Now that you have chosen the drones’ main parts, the frame, motors, batteries and the ESCs and other small parts it is now time to get something to join all these parts and teach them how to properly behave so you can build your own drone that actually flies. This thing is called the Flight controller. In this guide I will tell you what you need to look for when getting your Flight controller.
 Microprocessor
The microprocessor is the brains of the flight controller and takes all the inputs which are usually analog in nature and translates them into digital signals to make it possible for it to tell the ESCs what they need to do to accomplish what the pilot wants to do. Basically you need to get the fastest processor that you can afford simply because of all the things that need to be calculated and controlled at a single time.
Power
Not a lot needs to be discussed here except that you need to look out for the required input voltage by the flight controller to be compatible with the power supplied by the BEC. This is usually 5V but check to make sure things match and you don’t burn out your controller.
SENSORS
The different sensors tell the flight controller what it needs to know in order to be able to tell the ESCs what to do. These are the eyes and ears of a drone. There are several different things which can be monitored by a flight controller at a time, at a bare minimum every controller has a three axis gyroscope, other sensors discussed below are not necessarily included in all flight controllers, but of course the more the better.
Accelerometer
Measures linear acceleration on up to three axes (X, Y, and Z). Since it measures earth’s gravity this is what tells the drone which way is up and which way is down and as such allows an RC drone to remain stable in the air.
Gyroscope
Detects angular changes on up to three angular axes (alpha, beta, and gamma) meaning it measures how fast the drone is rotating in any axis.
Compass / Magnetometer
This measures the Earth’s magnetic field to determine the drone’s magnetic North and is needed with a GPS to determine the way the drone is facing at any point in time.
Inertia Measurement Unit (IMU)
An electronic board that combines the above sensors mostly. Some IMUs do not include a Magnetometer though.
Barometer
A sensor that measures the atmospheric pressure around the drone. This, combined with a GPS, can give a prey accurate reading of how high above the sea level the drone actually is.
GPS
A Global Positing System that uses several satellites orbiting around the Earth to triangulate the exact 3D position of a drone. Some GPS chipsets also use GLONASS which is an equivalent system developed by Russia.
Distance
As we mentioned above, the GPS along with the Barometer can give a very accurate position in relation to how high above the sea level the drone actually is. However this is surely not enough when you are facing a hill or even a tree or a wall.
This is why some advanced drones include sensors, which measure the distance between the UAV and its surroundings. Some DJI models include a “Guidance” system that includes visual cameras, ultrasonic sensors and a dedicated chip to determine how far it is from any obstacle in order to avoid crashing into stuff.
Software
To get the flight controller to do what you want you need to program it using a computer first and tell it what is what. This is done via a relatively user-friendly GUI software so check it out before you choose a controller.
Advanced Features
Some flight controllers can combine the inputs of the sensors mentioned above to allow you some advanced level control, things like Autonomous waypoint navigation and orbiting use the GPS to either fly along a set path that you draw on the controller or fly around a single coordinate. These modes are quite useful for video photography. “Follow me” is another useful feature found on advanced drones which allows the drone to follow a certain device along any path it takes.
Also if you are into programming you might want to look into an open source software for the flight controller which will allow you to tinker around to get the flight characteristics you want.
Communication Protocol
Many different forms of protocols exist to transmit the signal from your controller to the drone, and they are, Radio Control The most common method of controlling a UAV is by using Radio Control communication. This involves a handheld RC transmitter, which you hold, and a RC receiver that needs to be installed on the drone. These differ in the number of channels it uses.
An absolute minimum is four channels used to control Pitch, Elevation, Yaw, and roll. Other channels can be used to control things like, on/off, gimbal controls, change of flight mode, buzzer, etc.
Bluetooth
This is the same protocol used on your smartphone. Not very common protocol but used in some controllers nonetheless. WiFi Some drones have a WiFi access point that allows your controller to pair with it using Adhoc mode. This can be useful but is limited in range.
Radio Frequency
Similar to Radio control described above in the sense that it has an RF transmitter and Receiver. This is usually used by connecting an RF unit to a computer and can be used to control a drone over long distances. Infrared IR This is the technology used by your TV remote control. It is not very common because it has many drawbacks, mainly of interference and more importantly because it needs line of sight to work.
Final thoughts
Other notable things to consider when choosing a flight controller is whether or not there is support for it because you will need help setting it up and programing it, so choose a popular model that has a support community of similar enthusiast to help you along your journey. Of course, physical stuff like mounting holes and a protective casing can be nice things to have as well as some diagnostic screens.
This is the End of Part one of this article on how to build your own drone where we covered the major parts needed to build your own drone. Part 2 will show you the actual steps to assemble all these parts together to build your own drone.
In theory, this is the least expensive configuration to build because you simply have to get less of everything, less motors, less servos, less propellers and even a smaller chassis.
1 BiCopter

However this configuration can get quite challenging to balance during flight and is not very popular among multirotor builders and there isn’t a lot of information about it online. So if this is your first build I highly suggest you skip this design. However if you have built a few drones before this might be a good challenge to get into, and if you do please show me the images of the build!
Pros: Relatively cheap to build and can make for a cool build. Cons: Can be extremely hard to build a working bicopter and fly stably.
2 TriCopter

Pros: A more unique configuration to choose when building a drone because it operates similar to a plane more than it does as a copter. This will cost a bit more than a BiCopter but less than other configurations. Cons: As mentioned above the rear of the copter needs to either have a servo or two motors making designing and building this configuration more complicated.
3 QuadCopter
This type of quadcopter design is eadily the most common among builders. As its name suggests it has four motors attached to four arms in a symmetrical configuration however the forward direction varies, the most typical direction put it between two arms resulting in what’s called an X configuration. Another option is to have the forward direction along on of the axises making it a + configuration. For a beginner this is the configuration to choose.

Pros: Simple and easy to start with, balanced configuration and has lots of compatible parts. This is the configuration to start with. Cons: No configuration is without its faluts. Because of its basic shape and design there is no backup incase anything fails. So if a motor fails or a rotor breaks the drone will go down because opther parts cannot compensate for the loss resulting ina crash. So you need to make sure to test proerply and get some quality parts to start with.
4 HexaCopter
Things are getting more interesting now, this one has 6 arms with six motors attached to them. The added motors provide more lift, i.e. They allow the UAV to carry more payload and fly more stably. This helps a lot when building a drone for aerial photography as you can use a more professional and hence heavier equipment to get that perfect shot. The forward direction of this UAV can be either between tow arms or along one of the arms.

5 Y6 Copter
Another UAV configuration with six motors but this time it only has three arms to connect all the motors. This types looks quite similar to a TriCopter but with the added motor on each arm. Note that all the motors, even those facing downwards, push air downward to counteract gravity. This gives redundancy, so in case a motor failure this drone can land itself without crashing.

Pros: This is kind of a hybrid design, it only has three arms instead of four or six meaning less weight and in general has less components than a HexaCopter making it cheaper. And because of the double motors on each arm the gyro effect is eliminated meaning no need for a servo.
Cons: While this has less components than a HexaCopter it has more total components than a quadcopter meaning it weighs more and as such will need a bigger battery to achieve the same flight time. Also when compared to a similar spec HexaCopter this configuration has less payload because the upper motor is affected by the lower motor reducing efficiency. Also not all flight controllers support this configuration.
6 OctoCopter
Moving into the big leagues, this configuration has eight motors connected to eight arms, this makes for a very powerful drone capable of lifting quite a big payload. But as you would imagine this all means more parts, more weight, more batteries and more costs. As a first time build this is not a configuration I would recommend, but if you have the parts from previous failed attempts, then why not, right?

Cons: As discussed earlier, this configuration means more. More of everything. You will need to get extra motors, ESCs, arms, batteries and everything else to support such a monster drone making this quite expensive feat to tackle, and making this more complicated than building a quadcopter.
7 X8

WHAT ARE THE DIFFERENT SIZES OF DRONES?
Another important factor to consider is how big a drone you want to build. Drone sizes vary a lot, there are those Nano drones, which are smaller than your palm, and there are drones made to fit inside your pocket, all the way up to military sized drones, which need vehicles to transport them.
For a new builder getting a medium or small sized frame is ideal, you will have decent space to work and yet it is small enough to be manageable and not requiring lots of power to fly, so what you are looking for is a frame size between 350 and 600mm. These numbers represent the greatest distance between the mounting points for the motors measures in millimeters.
ARE SMALLER DRONES LESS EXPENSIVE TO BUILD THAN LARGE ONES?
In theory, yes. Smaller drone means smaller and less powerful batteries and motors needed to fly a quadcopter, but in reality, the choice of equipment determines the final cost. Choosing high quality brushless motor well cost more than a brushed one, regardless of size. The same applies to batteries as well. Therefore, while the frame well definitely cost less if it is smaller the total price for a drone does not necessarily reflect its size.
WHAT MATERIALS ARE DRONES BODIES MADE OF?
When building your own drone you can choose to build it using any solid material you can think of as long as it is strong enough, in theory at least. But to create an efficient drone you need to consider several factors when choosing what materials to use. For example, the drone body needs to be as light weight as possible, strong enough to handle crashes, does not transmit vibrations and cheap enough to obtain and fix. So let’s consider some materials which have been used for building drones.
PLASTIC

The most commonly used material for building “small toys” is plastic. And drones are no different. Most of the commercial drones are built using plastic. If you want to build your own frame however you need plastic sheets which are rigid and don’t flex easily so your UAV can balance itself and fly properly. Recently 3D printing the frame of a drone has been booming, this might be a good option for a small drone but maybe not so much for bigger ones.
WOOD
Wood is not a material I would recommend for a drone build, but it has been used before and if you are good with a saw and know, your way around woodworking then this can be an effective DIY material to start with. Just make sure you choose a strong and rigid wood type. You also need to make sure that your design is modular so in case of a crash you will only need to replace the broken part and not start a new frame.
ALUMINUM

Another common and easily accessible material is aluminum. This is strong enough to sustain a few crashes without damage. Indeed there are stronger materials and there are cheaper materials, but aluminum sets itself apart by being a middle ground among all of those. Also the fact that you can find readily available sections of aluminum of all shapes and sizes helps a lot.
CARBON FIBER
A much more fancier option is using carbon fiber to build your drone. Due to its high strength and light weight you can build amazing drones capable of high payloads and high speeds using carbon fiber. But all of this is not cheap of course. Also take note that carbon fiber interferes with radio signals so your antenna range can be affected if mounted incorrectly.
WHICH FRAME TO USE FOR A DRONE?
If you are starting out then building your own frame for a drone is not something I recommend an you are better off buying a ready made frame that will fit all the equipment you need. With all that said and done the most important factor in deciding which frame to get for your drone build is what do you intend to use the drone for. So here are my recommendations for frames based on the expected use…
OTHER CONSIDERATIONS WHEN CHOOSING A FRAME
Gimbal

Payload
Another interesting use of used is to delivery items, or even release and drop items. If this is something you think you want to play with then you need to account for the size of objects and their relation to the center of gravity of the drone to keep it balanced.
Landing gear

PART 3: MOTORS, PROPELLERS, AND PROPULSION
Now that you have decided what your end goal would be in regards to the drone you are building and have chosen a frame accordingly, the next step in building your own drone is to think about how we will get it to fly! This part is called the propulsion system, and is composed of motors, propellers, ESCs, and battery.
THE MOTOR
Which is better for a drone, a brushed motor or a brushless motor?
Generally speaking brushless motors are better because they produce more thrust but are more expensive than brushed motors. This is why cheaper drones like the Syma X5 series uses brushed motors, while the DJI uses brushless ones. Other downsides of brushed motors is that they can wear out faster than brushless ones meaning they are more likely to fail and need replacing.
On the good side, brushed motors are easier to connect and wire up because they only have 2 wires instead of 3 for the brushless motors. Also when choosing a motor please note that mounting holes needed as well as the propellers mounting is compatible with the props you have chosen.
Thrust
Another important factor you need to consider when choosing a motor for your drone build is thrust. This is usually supplied by the manufacturers in a table indicating the amount of thrust (indicated in Kg, Lbs., or N) per propeller size. How can you use this data? Let’s say a motor spec is 0.5KG with a 10” propeller.
This means if you are building a quadcopter with 4 of this motor and using 10” props on it then the total weight of the must not exceed 2 KGs ( 4 x 0.5 Kg = 2.0 Kgs ). In this case, if your drone weighs exactly 2 Kgs then it might not even take off, so you will either need to lower its weight or get stronger motors. Always have more lifting power than the total weight of your drone.
PROPELLERS

Now what concerns us with this topics how to choose a prop. For new builders I suggest not to reinvent the wheel, check out what is the recommended props to be used with the motor you have chosen and read op online and see what others are doing, makes things much simpler. However there are a couple of points you need to keep in mind, first the size of the props and the rotation of the props.
PROPELLERS’ SIZE
The size of the props is indicated in either cm or inches and is measured from the furthest two points of the blades. What you need to know about this is that in general smaller blades are best for racing drones where fast reactions and required and larger blades are best suited for more stable flights like aerial photography.
PROPELLER ROTATION

You need to pay special attention to the way it mounts because the way that is supposed to face upward still needs to face upwards, even if it is mounted below. The documentation that came with the flight controller should show you which way each propeller is intended to turn for each multi-rotor it supports
MATERIALS USED TO MAKE PROPELLERS
Just like the frame, the propellers can be made from various materials, each with its own pros and cons.
PLASTIC
Because of its low cost and respectable durability, plastic is by far the most popular choice for propellers in the multi-rotor industry but plastic propellers do have their downsides, they are not very reliable. Incase you crash, especially if you do not have prop guards on, you are very likely to break the plastic propellers. Even with the guards on a serious crash can still break your props. They shouldn’t be a huge problem because of their low price you can easily replace them. Most commercial quads even come with several spare propellers included.
WOOD

CARBON FIBER

And finally the top of the line material to choose from propellers is carbon fiber. Carbon fiber is much stronger and more stiffer than plastic meaning it is less likely to break during a crash but it is much more expensive than plastic. If you ask me, the cost, benefit ratio favors plastic. So unless you are building a top of the line drone and you are already good at flying I would stick with plastic propellers.
PROPELLERS GUARDS

At least that’s the theory, but of course in the real world if you crash hard you are still likely to break the props, which is why I recommended cheap spare props to be always available. Note though that having prop gaurds does add weight to your drone making your flight time that much shorter but they are important to have until you really know how to fly.
THE ELECTRONIC SPEED CONTROLLER (ESC)

This electronic component links the flight controller with the motor. What it does is control the voltage and power that the motor receives and thus setting the speed that the motor spins and how much lift is generated. This is essential to be controlled for each of the drones motors which is why you will need an ESC for each motor you have on the drone. Things to note when choosing an ESC is that it is able to handle more than the maximum current that the motor needs so that it does not burn out, also that is has the right voltage.
CONNECTORS
Connecting the Electronic Speed Controller can seem confusion at first because of all the wires it has on both sides, and they are; On the input side you will have two wires for the power, usually thicker than the others, and you will have 3 wires for the input signal usually bullet connectors. And on the output side you will have another 3 wires that you need to connect to your motor.
FIRMWARE
Since the ESC’s job is to translate the flight controllers commands into voltage signals to control the motor, the ESC needs to be able to give out commands quickly. The problem with this is that drones in general are new in comparison to other remote control toys, which also use ESCs. As such, the ESCs were originally designed for RC cars; these do not require the fast output needed by a drone to be able to stabilize itself midair. Therefore, you will need to choose an ESC with a firmware that is built for drones, the most popular of which use SimonK or bheli firmware.
POWER DISTRIBUTION BOARD

BATTERY

As everything in life, LiPos are not perfect, they have two problems, first their cost is higher and if not handled properly they can be a fire risk. Things to look for when choosing a battery pack are the Voltage, Discharge rate and capacity.
Voltage
First check the voltage of the motors you have chosen, the voltage on the battery pack and the motors need to match. LiPo batteries are mostly made of 3.7V cells. On the battery spec you will find marking like 4S, a 1S equals 3.7V so 4S is 14.8V.
Capacity
This is measured in Ampere Hour Ah and can range from 0.1 Ah (100mAh) to much more than that. Typical drone batteries are 2 to 3 Ah. Choosing which capacity seems obvious, the bigger means more flight time, but you need to consider that bigger means heavier as well. You can expect about 10 to 20 minutes of flight time from a typical drone which is not much so you should get extra batteries.
DISCHARGE RATE
This measures how fast the battery capacity can be fully used or discharged. It is measured in C where C is the battery capacity. What you need to look for in a battery is at least 5C meaning is can fully discharge itself in 1/5 of an hour.
Other things to consider
As we already mentioned in the introduction, LiPo batteries need to be handled properly to prevent fire or explosion risk so if you have your doubts about the battery or the charger it is better to be safe than sorry and you should simply replace the suspect part. Particularly if you notice that the battery pack has become bigger this indicates that it is leaking and must be disposed of properly.
When storing or charging the battery you should put it inside a LiPo safe bag to prevent fires and you should not leave it charging overnight. Most LiPo batteries have two connectors, one is used to connect the ESC and the other is used for charging, the manual should tell you which is which, but usually the smaller wires are used for charging. You need to choose a charger that can charge several batteries at once and is balanced to prevent any damage to the batteries.
PART 4: THE FLIGHT CONTROLLER
Now that you have chosen the drones’ main parts, the frame, motors, batteries and the ESCs and other small parts it is now time to get something to join all these parts and teach them how to properly behave so you can build your own drone that actually flies. This thing is called the Flight controller. In this guide I will tell you what you need to look for when getting your Flight controller.

The microprocessor is the brains of the flight controller and takes all the inputs which are usually analog in nature and translates them into digital signals to make it possible for it to tell the ESCs what they need to do to accomplish what the pilot wants to do. Basically you need to get the fastest processor that you can afford simply because of all the things that need to be calculated and controlled at a single time.
Power
Not a lot needs to be discussed here except that you need to look out for the required input voltage by the flight controller to be compatible with the power supplied by the BEC. This is usually 5V but check to make sure things match and you don’t burn out your controller.
SENSORS
The different sensors tell the flight controller what it needs to know in order to be able to tell the ESCs what to do. These are the eyes and ears of a drone. There are several different things which can be monitored by a flight controller at a time, at a bare minimum every controller has a three axis gyroscope, other sensors discussed below are not necessarily included in all flight controllers, but of course the more the better.
Accelerometer
Measures linear acceleration on up to three axes (X, Y, and Z). Since it measures earth’s gravity this is what tells the drone which way is up and which way is down and as such allows an RC drone to remain stable in the air.
Gyroscope
Detects angular changes on up to three angular axes (alpha, beta, and gamma) meaning it measures how fast the drone is rotating in any axis.
Compass / Magnetometer
This measures the Earth’s magnetic field to determine the drone’s magnetic North and is needed with a GPS to determine the way the drone is facing at any point in time.
Inertia Measurement Unit (IMU)
An electronic board that combines the above sensors mostly. Some IMUs do not include a Magnetometer though.
Barometer
A sensor that measures the atmospheric pressure around the drone. This, combined with a GPS, can give a prey accurate reading of how high above the sea level the drone actually is.
GPS
A Global Positing System that uses several satellites orbiting around the Earth to triangulate the exact 3D position of a drone. Some GPS chipsets also use GLONASS which is an equivalent system developed by Russia.
Distance
As we mentioned above, the GPS along with the Barometer can give a very accurate position in relation to how high above the sea level the drone actually is. However this is surely not enough when you are facing a hill or even a tree or a wall.
This is why some advanced drones include sensors, which measure the distance between the UAV and its surroundings. Some DJI models include a “Guidance” system that includes visual cameras, ultrasonic sensors and a dedicated chip to determine how far it is from any obstacle in order to avoid crashing into stuff.
Software
To get the flight controller to do what you want you need to program it using a computer first and tell it what is what. This is done via a relatively user-friendly GUI software so check it out before you choose a controller.
Advanced Features
Some flight controllers can combine the inputs of the sensors mentioned above to allow you some advanced level control, things like Autonomous waypoint navigation and orbiting use the GPS to either fly along a set path that you draw on the controller or fly around a single coordinate. These modes are quite useful for video photography. “Follow me” is another useful feature found on advanced drones which allows the drone to follow a certain device along any path it takes.
Also if you are into programming you might want to look into an open source software for the flight controller which will allow you to tinker around to get the flight characteristics you want.
Communication Protocol
Many different forms of protocols exist to transmit the signal from your controller to the drone, and they are, Radio Control The most common method of controlling a UAV is by using Radio Control communication. This involves a handheld RC transmitter, which you hold, and a RC receiver that needs to be installed on the drone. These differ in the number of channels it uses.
An absolute minimum is four channels used to control Pitch, Elevation, Yaw, and roll. Other channels can be used to control things like, on/off, gimbal controls, change of flight mode, buzzer, etc.
Bluetooth
This is the same protocol used on your smartphone. Not very common protocol but used in some controllers nonetheless. WiFi Some drones have a WiFi access point that allows your controller to pair with it using Adhoc mode. This can be useful but is limited in range.
Radio Frequency
Similar to Radio control described above in the sense that it has an RF transmitter and Receiver. This is usually used by connecting an RF unit to a computer and can be used to control a drone over long distances. Infrared IR This is the technology used by your TV remote control. It is not very common because it has many drawbacks, mainly of interference and more importantly because it needs line of sight to work.
Final thoughts
Other notable things to consider when choosing a flight controller is whether or not there is support for it because you will need help setting it up and programing it, so choose a popular model that has a support community of similar enthusiast to help you along your journey. Of course, physical stuff like mounting holes and a protective casing can be nice things to have as well as some diagnostic screens.
This is the End of Part one of this article on how to build your own drone where we covered the major parts needed to build your own drone. Part 2 will show you the actual steps to assemble all these parts together to build your own drone.